Wednesday, June 14, 2017

PIC16F877A LM35 Temperature Monitor

Hello Everyone, After giving you some Arduino based projects, This time it is a PIC16F877A Based project.

This is a simple temperature monitor based famous analogue LM35 Temperature monitor. This circuit used the AD converter of the microchip and use three seven segments displays to show the temperature.

Here the schematic :


Unfortunately the source code is in Assembly format and it is an image I have to publish here. You can use MPLAB IDE to write this code and build it.

Here is the Source Code :


This project I extracted from "Vidusara" Science magazine which published in Sri Lanka. It is the most famous science magazine in Sri Lanka.

This project was designed by Mr. Gamini Jayasinghe and Mr. Kolitha Dharmapriya (University of Moratuwa)

Friday, May 19, 2017

Servo Motor Controlling with Arduino

Hello friends, after some time here another post about motor controlling and this time I am going to control a Servo Motor with Arduino Uno.

Servo motor is an essential device for all Robotic lovers. For an example, to control a Robotic arm, You need a servos.

Using Arduino, you can easily control servo motors. Arduino has a special library called "Servo"

Here are some images I took while I do the experiment.


For source codes and echematics, please follow the Arduino official tutorial page.

Here is the link : Arduino Servo


Saturday, April 15, 2017

Arduino Nokia 5110 Graphics Display

After long time I could find a time to add a new post. Recently I purchased a Nokia 5110 Graphics display module and I could do some interesting stuff with it.

Connecting the display to the Arduino is very easy. No need any other devices except some hookup wires.

Here is my setup.


Please go to this link to the complete tutorial with Source Codes. Have a nice day.

Monday, December 12, 2016

Stepper Motor Controlling using Arduino

I found a stepper motor from a broken printer and I was thinking how to control this. Because controlling an stepper motor is not easy as controlling a simple DC motor.

First I found that the stepper was a uni-polar type one. Then using Arduino stepper library, it was a peace of cake building this project.

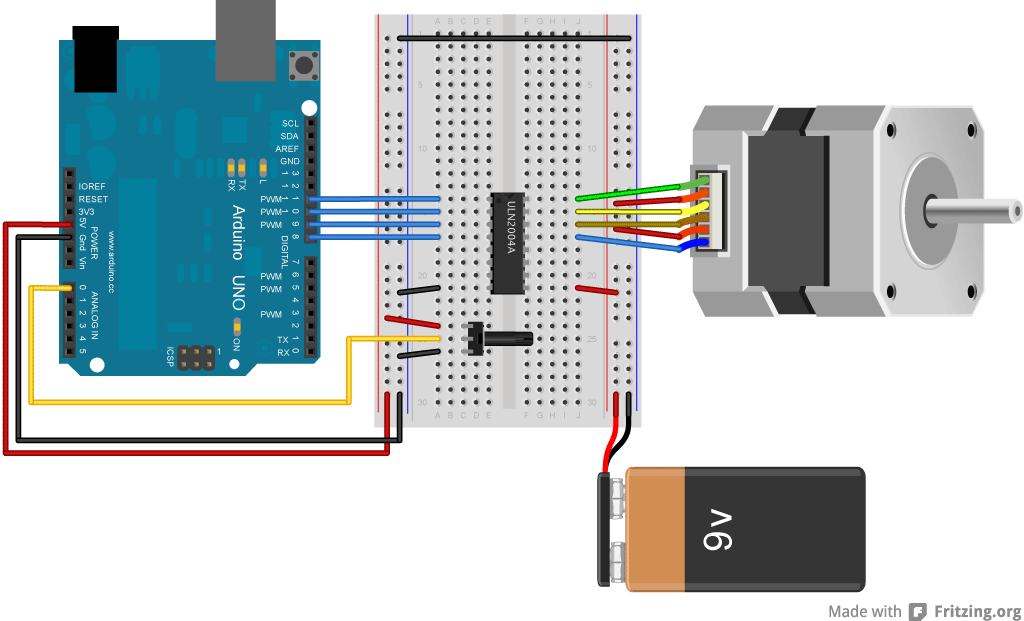
I purchased ULN2004A motor controller and here is the schematic from Arduino official tutorial.

This is an interesting project because you can control the speed of your stepper motor using potentiometer. I used a 50K (Kilo Ohms) one.

Here is an image of my project setup :


Here is the video of my project:


And here is the Arduino official tutorial page link. You can find the source code from this link. Have a good day!!


Friday, November 18, 2016

PIC16F877A Prototyping Board

I built my second prototyping board and this time it is for the big guy PIC16F877A. I used a ZIF socket to easily remove and re connect the microcontroller.


Same as the previous board I built this on a vero board. I added a 7805 regulator and 4 MHz crystal oscillator. And also female headers for all the required ports and some additional headers for power output. 
Here is the schematic of the circuit.


You can also try this. Comments are always welcome!!

Sunday, October 30, 2016

PIC16F84A Prototyping Board

I was doing some experiments with PIC16F84A Microcontroller and I got bored doing it on project board. So I wanted to build a small prototyping board and I did. Here is my prototyping board for PIC16F84A Microcontroller.


I built it on a Vero board and it has a 7805 regulator so that I can directly connect it to different power sources. I also added IN4001 diode to protect it from voltage direction mistakes. I added female headers to PORT A and PORT B pins so that I can connect sensors, LEDs etc. I also added few headers to ground and +5V to get output power.

Here is the schematic of the circuit.


The oscillator I used was 4MHz one and it is ok for most experiments.

If you are planning to build this, I advise you to use a ZIP socket instead of the general IC socket. Good Luck.

Friday, October 7, 2016

Raspberry PI LED Blink Tutorial

Hello Friends, Today I am going to create a Raspberry Pi LED Blinking Project. I am using Raspberry Pi 3 Model B for this tutorial.

In this tutorial, I will step by step show you how to write a simple Python code to blink an LED which connect to your Raspberry Pi via GPIO pins.

Here is the video of completed project.


Now it is the time to up your Pi and ready to get started.