I purchased the following module.
This blog is about Microcontroller electronic projects including PIC, Arduino and Raspberry Pi. I am writing this blog to share the details of experiments I do in my leisure time. Comments are always welcome. Have a nice day.
Saturday, December 14, 2019
Arduino Neo6M GPS Tracking
Hello friends. In this project let’s see how to add GPS capabilities to your Arduino. I will use small and low cost Neo 6M GPS module. You can buy this module from eBay or any other online electronic store around 5,6 USD.
I purchased the following module.
Saturday, May 25, 2019
Stereo MP3 Player with Arduino and DFPlayer Module
Hello everyone, Here again with an interesting project. If you already got bored dealing with sensors, motors, relays like stuff, here is a cool project for you. Here is an image of the project.
We are going to build a Stereo MP3 player with Arduino. Yes that's true. Using low cost DFPlayer module, we can easily do this project.
The DF Player module has all the features which a MP3 player should have. Including advance equalizers, looping and shuffling functions. But here I will show you how to build a simple player with Play/Pause and Next/Preview functions. Later you can add more features.
We will do this project in two steps. First we will build a simple MP3 player with a single speaker and then I will show you how to upgrade it as a Stereo player using a simple amplifier module and two speakers.
To continue reading, please click this link to visit my main blog page. No ads or fake URLs, don't worry.
Sunday, September 24, 2017
NodeMCU Introduction
In the connected world, we need to connect our devices to the Internet. Let's take a simple example. You need to monitor your home temperature from anywhere in the world. We did a simple temperature monitor project earlier using LM35 and Arduino. Now we need to connect this to the Internet. We can use your Home WiFi network for this. Or else make the connection using Ethernet cable.
Tuesday, July 25, 2017
PIC16F84A LED Running Project - Part 1
Hi Friends,
This time I present you a very simple project built using PIC16F84A Microcontroller. This is a simple LED running system and I hope this project will be helpful to beginners to understand basic concepts.
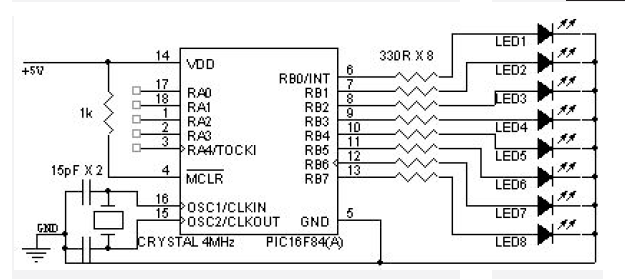
Here is the schematic of the project (Please click on the image to enlarge)
This time I present you a very simple project built using PIC16F84A Microcontroller. This is a simple LED running system and I hope this project will be helpful to beginners to understand basic concepts.
Here is the schematic of the project (Please click on the image to enlarge)
You need only few components to build this circuit. I hope all the parts are clear in the schematic (if not, please comment)
Here is the source code :
Please note that the code is written in Micro C
If you faced any problems, please comment. The second part of this project (which runs 40 LEDs without shift registers) will be posted soon.
Wednesday, June 14, 2017
PIC16F877A LM35 Temperature Monitor
Hello Everyone, After giving you some Arduino based projects, This time it is a PIC16F877A Based project.
This is a simple temperature monitor based famous analogue LM35 Temperature monitor. This circuit used the AD converter of the microchip and use three seven segments displays to show the temperature.
Here the schematic :
Unfortunately the source code is in Assembly format and it is an image I have to publish here. You can use MPLAB IDE to write this code and build it.
Here is the Source Code :
This is a simple temperature monitor based famous analogue LM35 Temperature monitor. This circuit used the AD converter of the microchip and use three seven segments displays to show the temperature.
Here the schematic :
Unfortunately the source code is in Assembly format and it is an image I have to publish here. You can use MPLAB IDE to write this code and build it.
Here is the Source Code :
This project I extracted from "Vidusara" Science magazine which published in Sri Lanka. It is the most famous science magazine in Sri Lanka.
This project was designed by Mr. Gamini Jayasinghe and Mr. Kolitha Dharmapriya (University of Moratuwa)
Friday, May 19, 2017
Servo Motor Controlling with Arduino
Hello friends, after some time here another post about motor controlling and this time I am going to control a Servo Motor with Arduino Uno.
Servo motor is an essential device for all Robotic lovers. For an example, to control a Robotic arm, You need a servos.
Using Arduino, you can easily control servo motors. Arduino has a special library called "Servo"
Here are some images I took while I do the experiment.
For source codes and echematics, please follow the Arduino official tutorial page.
Here is the link : Arduino Servo
Servo motor is an essential device for all Robotic lovers. For an example, to control a Robotic arm, You need a servos.
Using Arduino, you can easily control servo motors. Arduino has a special library called "Servo"
Here are some images I took while I do the experiment.
For source codes and echematics, please follow the Arduino official tutorial page.
Here is the link : Arduino Servo
Saturday, April 15, 2017
Arduino Nokia 5110 Graphics Display
After long time I could find a time to add a new post. Recently I purchased a Nokia 5110 Graphics display module and I could do some interesting stuff with it.
Connecting the display to the Arduino is very easy. No need any other devices except some hookup wires.
Here is my setup.
Please go to this link to the complete tutorial with Source Codes. Have a nice day.
Connecting the display to the Arduino is very easy. No need any other devices except some hookup wires.
Here is my setup.
Monday, December 12, 2016
Stepper Motor Controlling using Arduino
I found a stepper motor from a broken printer and I was thinking how to control this. Because controlling an stepper motor is not easy as controlling a simple DC motor.
First I found that the stepper was a uni-polar type one. Then using Arduino stepper library, it was a peace of cake building this project.
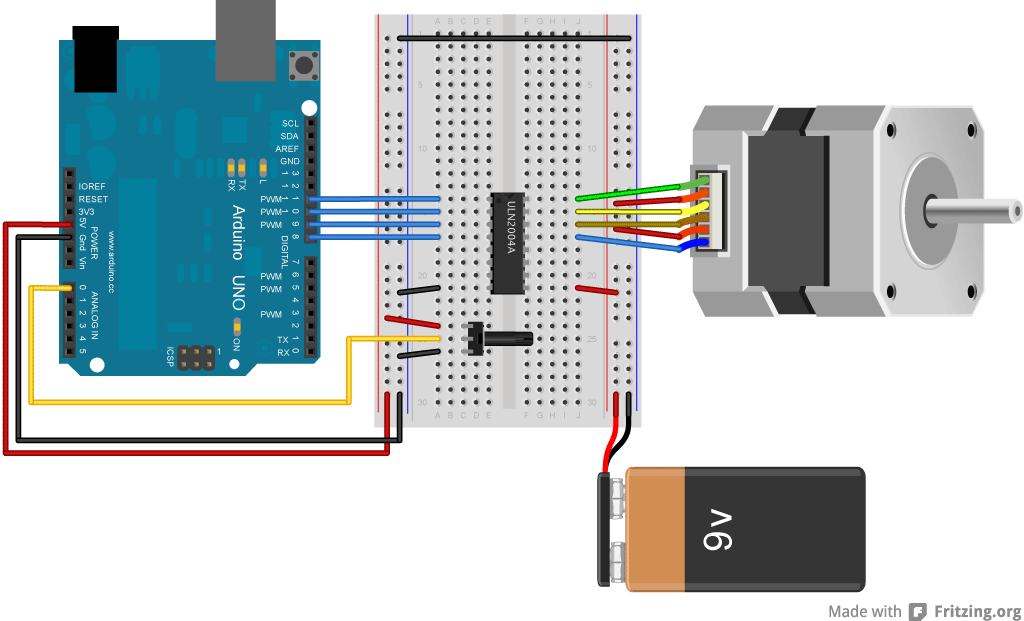
I purchased ULN2004A motor controller and here is the schematic from Arduino official tutorial.
First I found that the stepper was a uni-polar type one. Then using Arduino stepper library, it was a peace of cake building this project.
I purchased ULN2004A motor controller and here is the schematic from Arduino official tutorial.
This is an interesting project because you can control the speed of your stepper motor using potentiometer. I used a 50K (Kilo Ohms) one.
Here is an image of my project setup :
Here is the video of my project:
And here is the Arduino official tutorial page link. You can find the source code from this link. Have a good day!!
Friday, November 18, 2016
PIC16F877A Prototyping Board
I built my second prototyping board and this time it is for the big guy PIC16F877A. I used a ZIF socket to easily remove and re connect the microcontroller.
Same as the previous board I built this on a vero board. I added a 7805 regulator and 4 MHz crystal oscillator. And also female headers for all the required ports and some additional headers for power output.
Here is the schematic of the circuit.
You can also try this. Comments are always welcome!!
Sunday, October 30, 2016
PIC16F84A Prototyping Board
I was doing some experiments with PIC16F84A Microcontroller and I got bored doing it on project board. So I wanted to build a small prototyping board and I did. Here is my prototyping board for PIC16F84A Microcontroller.
I built it on a Vero board and it has a 7805 regulator so that I can directly connect it to different power sources. I also added IN4001 diode to protect it from voltage direction mistakes. I added female headers to PORT A and PORT B pins so that I can connect sensors, LEDs etc. I also added few headers to ground and +5V to get output power.
Here is the schematic of the circuit.
The oscillator I used was 4MHz one and it is ok for most experiments.
If you are planning to build this, I advise you to use a ZIP socket instead of the general IC socket. Good Luck.
I built it on a Vero board and it has a 7805 regulator so that I can directly connect it to different power sources. I also added IN4001 diode to protect it from voltage direction mistakes. I added female headers to PORT A and PORT B pins so that I can connect sensors, LEDs etc. I also added few headers to ground and +5V to get output power.
Here is the schematic of the circuit.
The oscillator I used was 4MHz one and it is ok for most experiments.
If you are planning to build this, I advise you to use a ZIP socket instead of the general IC socket. Good Luck.
Friday, October 7, 2016
Raspberry PI LED Blink Tutorial
Hello Friends, Today I am going to create a Raspberry Pi LED Blinking Project. I am using Raspberry Pi 3 Model B for this tutorial.
In this tutorial, I will step by step show you how to write a simple Python code to blink an LED which connect to your Raspberry Pi via GPIO pins.
Here is the video of completed project.
Now it is the time to up your Pi and ready to get started.
In this tutorial, I will step by step show you how to write a simple Python code to blink an LED which connect to your Raspberry Pi via GPIO pins.
Here is the video of completed project.
Saturday, August 6, 2016
PIC16F628A Programmable Timer
I was looking for a programmable timer and fortunaitly I could find a great project. First I was trying to build a simple timer circuit using NE555 or 4060 ICs. Then I wanted to move to a rich project with a LCD screen and ability to program for short and long duration times. Then I found this excellent project which exactly meets my requirements.
Then I built this project on a simple vero board and it is working very well. Here are two images of the built project.
You can set the maximum time to 99 Hours and 99 Minutes. The circuit has two options. First you can set the time which your device keep off and then the time you want to keep your device on. The display will show you the (count down) remaining time.
I am using this circuit to turn off and on lights of my house to a predefined time. I also added a battery backup to avoid resetting the timer on power breaks.
You can find more information from the below link. This is the link of the original source of this nice timer circuit.
Link to the original post with schematic and source code download
I should also thank the author Raj Bhatt for posting this great project.
Then I built this project on a simple vero board and it is working very well. Here are two images of the built project.
You can set the maximum time to 99 Hours and 99 Minutes. The circuit has two options. First you can set the time which your device keep off and then the time you want to keep your device on. The display will show you the (count down) remaining time.
I am using this circuit to turn off and on lights of my house to a predefined time. I also added a battery backup to avoid resetting the timer on power breaks.
You can find more information from the below link. This is the link of the original source of this nice timer circuit.
Link to the original post with schematic and source code download
I should also thank the author Raj Bhatt for posting this great project.
Labels:
LCD,
Microcontroller,
PIC16F628A,
Programmable,
Timer
Location:
Colombo, Sri Lanka
Thursday, June 30, 2016
SainSmart Raspberry Pi 3 Model B Starter Kit
I recently bought SainSmart Raspberry Pi 3 Model B starter kit and not disappointed at all.
I bought it from one of eBay seller and it was very much worth for the price. I received the item even before the estimated date and also in a good package. At the time I write this article, the price of this set was US $51.29
Here is the link of the eBay seller : Link of the Seller
I bought it from one of eBay seller and it was very much worth for the price. I received the item even before the estimated date and also in a good package. At the time I write this article, the price of this set was US $51.29
Here is the link of the eBay seller : Link of the Seller
Following items include in this set.
- 1x New 2016 Raspberry Pi 3 (This is element 14 version)
- 1x SainSmart ABS Black Case (Fits to the pi well)
- 3x Aluminum Heat-sink (Average heat sinks)
- 1x 5V Micro USB Charger Power Supply (Good quality charger, it can run your pi with some loads without any issue)
- 1x USB Cable (Generic micro USB cable. you can use as your mobile phone data cable too ;)
- 1x Quick-Start Guide (Basic guide with some information to up your pi)
This set does not includes a micro SD card. And also GPIO cable also not included.
Sunday, June 12, 2016
Ultrasonic Distance Measurement with Arduino
We can use ultrasonic sensors to measure distance with Arduino. There are several types of ultrasonic sensors available in the electronic market. In this example, I am using the famous HC-SR04 type ultrasonic sensor. This sensor is cheap, easy to connect to Arduino and highly used in robotic projects to identify obstacles. I will also use a LCD screen to display the distance in both Inches and Centimeters.
Sunday, January 10, 2016
Arduino and DS1307 LCD Digital Clock Project
1) Introduction and Images
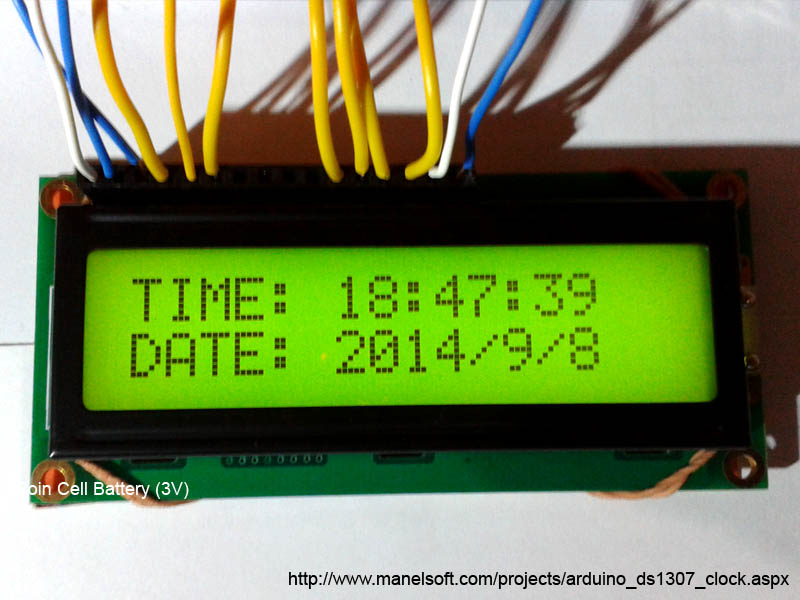
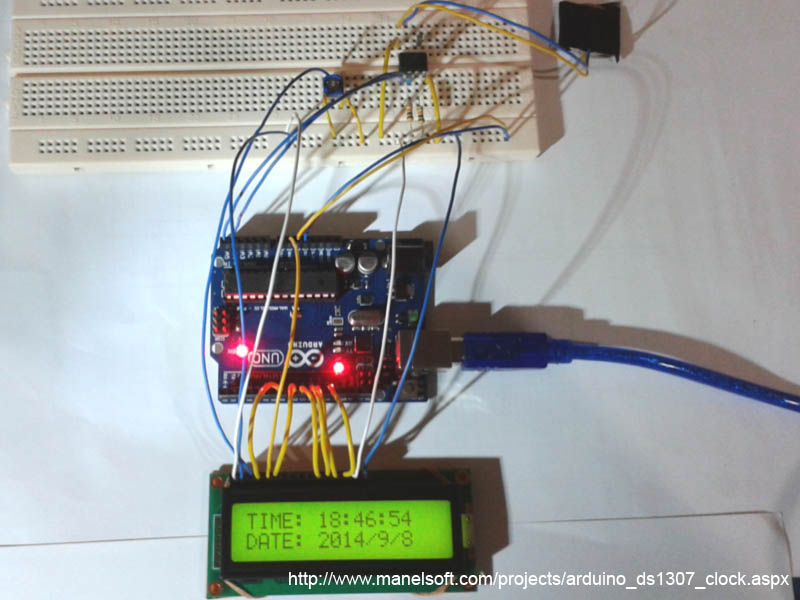
Hello friends, today I am going to build a Digital Clock using Arduino UNO and famous DS1307 Real Time Clock IC.
Thursday, April 17, 2014
PIC16F84A Matrix LED Display
Matrix LED display created using PIC16F84A Microcontroller and 8*16 Matrix display. You can display your own running text message. Two 4017 digital ICs were used to control electrical signals for Matrix display.
Download project details including source code and user guide from the below link
*Please note that I used MPLAB Versio 8.3 to build the code. (Not the latest version). If you have any error while compiling the code, please use an old version of MPLAB or use the compiled HEX files to program.
Extracted from the book - PIC Programming. Author - Mr. Sarath Premachandra.(4S5AS) City & Guild London. Credits goes to him.
Monday, April 14, 2014
PIC16F84A Digital Clock
Digital clock made using 6 seven segment modules to display Hours, Minutes and Seconds.
4017 Digital IC also used to control Microcontroller signals over Seven Segment Modules.
Special Components : 4MHz Crystal Oscillator
4017 Digital IC also used to control Microcontroller signals over Seven Segment Modules.
Special Components : 4MHz Crystal Oscillator
Download project details from the following link :
*Please note that I used MPLAB Versio 8.3 to build the code. (Not the latest version). If you have any error while compiling the code, please use an old version of MPLAB or use the compiled HEX file to program.
Extracted from the book - PIC Programming. Author - Mr. Sarath Premachandra.(4S5AS) City & Guild London. Credits goes to him.
Thursday, November 28, 2013
PIC Microcontroller Programming
Hi Friends,
I created this blog to share some of the Microcontroller projects I have created. I created this blog today and I will add more cool stuff soon. For now please reach the following link to download two interesting projects based on PIC16F84A Microcontroller.
http://www.manelsoft.com/projects/projects_home.aspx
Thanks and Regards
Dinesh Kumar Wickramasinghe
I created this blog to share some of the Microcontroller projects I have created. I created this blog today and I will add more cool stuff soon. For now please reach the following link to download two interesting projects based on PIC16F84A Microcontroller.
http://www.manelsoft.com/projects/projects_home.aspx
Thanks and Regards
Dinesh Kumar Wickramasinghe
Subscribe to:
Posts (Atom)